Democratize Network Automation
Overview
In this lab we will review how we can provide access to network automation capabilities to any user of our company, democratizing the access to network automation to anyone, not needing any scripting or automation skills.
Not everyone in the company has access to create their own monitors/objects in SevOne, normally only admins do. However, in other to increase efficiency in internal processes, it would be good to have some kind of portal that allows people to create their own monitors, without the need of giving full access to the SevOne platform.
In this lab we are allowing users to create TCP monitors (PortShaker) on demand using the Automation Center, therefore they don't need admin access to the SevOne portal, they can create the TCP monitors on their own in a very easy way, reducing the waste of time and hassle on the SevOne admins.
Monitor New Metrics in SevOne - Adding PortShaker Monitor
If SevOne authentication has already been created, please skip this block of actions and continue to step 4.
Log into SANO automation platform
Go to Authentications
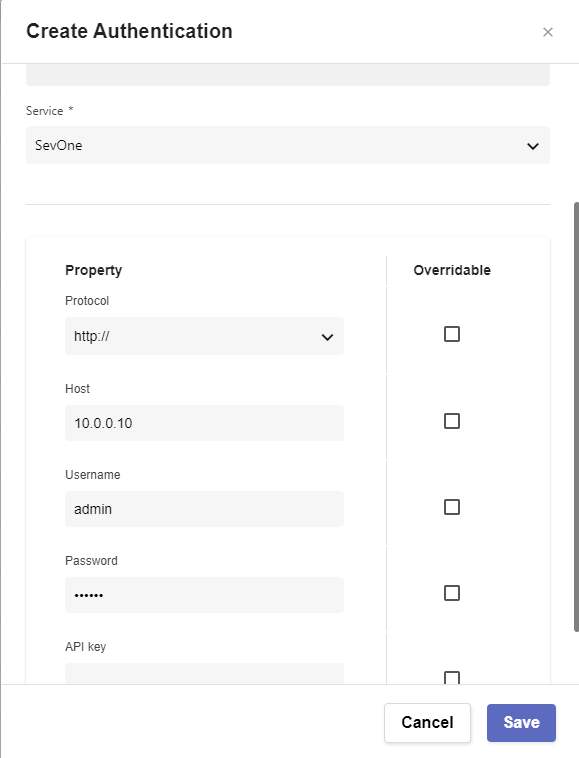
Click Create Authentication
a. Name: SevOne
b. Service: SevOne
c. Protocol: http:// (<-- important)
d. Host: 10.0.0.10
e. Username: admin
f. Password: SevOne
Go to Workflows
Click Create Workflow
a. Name: Your Name - Create PortShaker
b. Layout type: Sequence
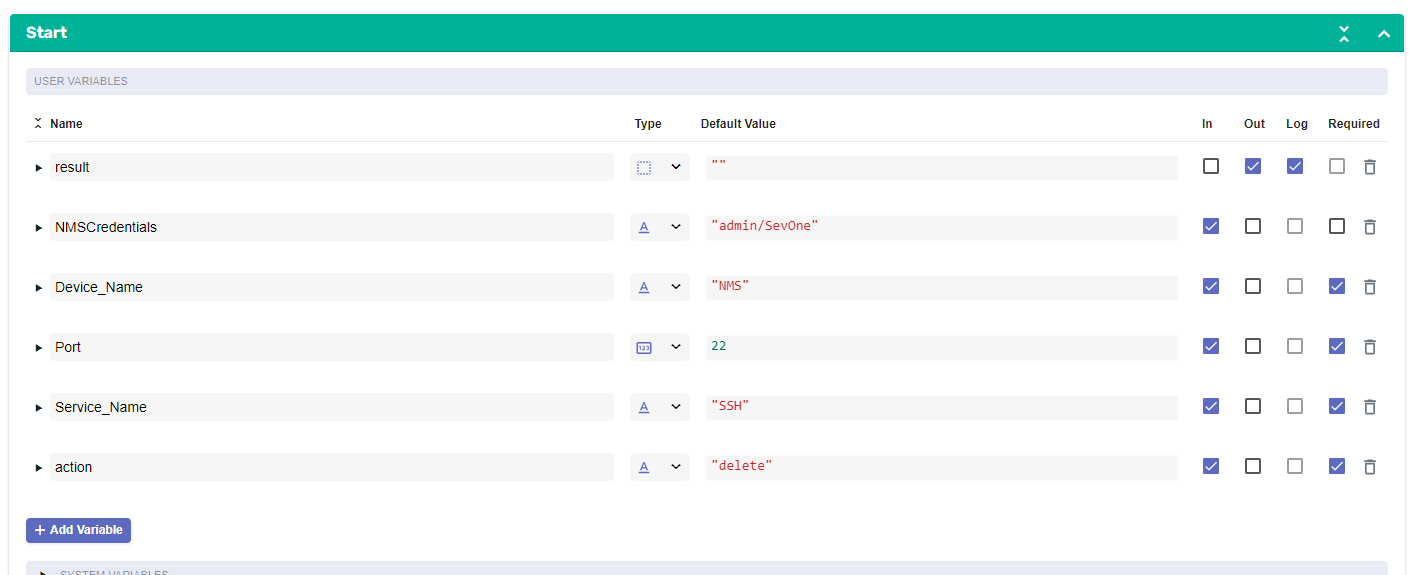
Add variables to Start
a. NMSCredentials
i. Name: NMSCredentials

ii. Type: Authentication -> SevOne

iii. Default Value: "admin/SevOne"
a. Device_Name
i. Name: Device_Name

ii. Type: String

iii. Default Value: "NMS"

iv. In

v. Required
a. Port
i. Name: Port

ii. Type: Number

iii. Default Value: 22

iv. In

v. Required
a. Service_Name
i. Name: Service_Name

ii. Type: String

iii. Default Value: "SSH"

iv. In

v. Required
a. Action
i. Name: Action

ii. Type: String

iii. Default Value: "add"

iv. In

v. Required
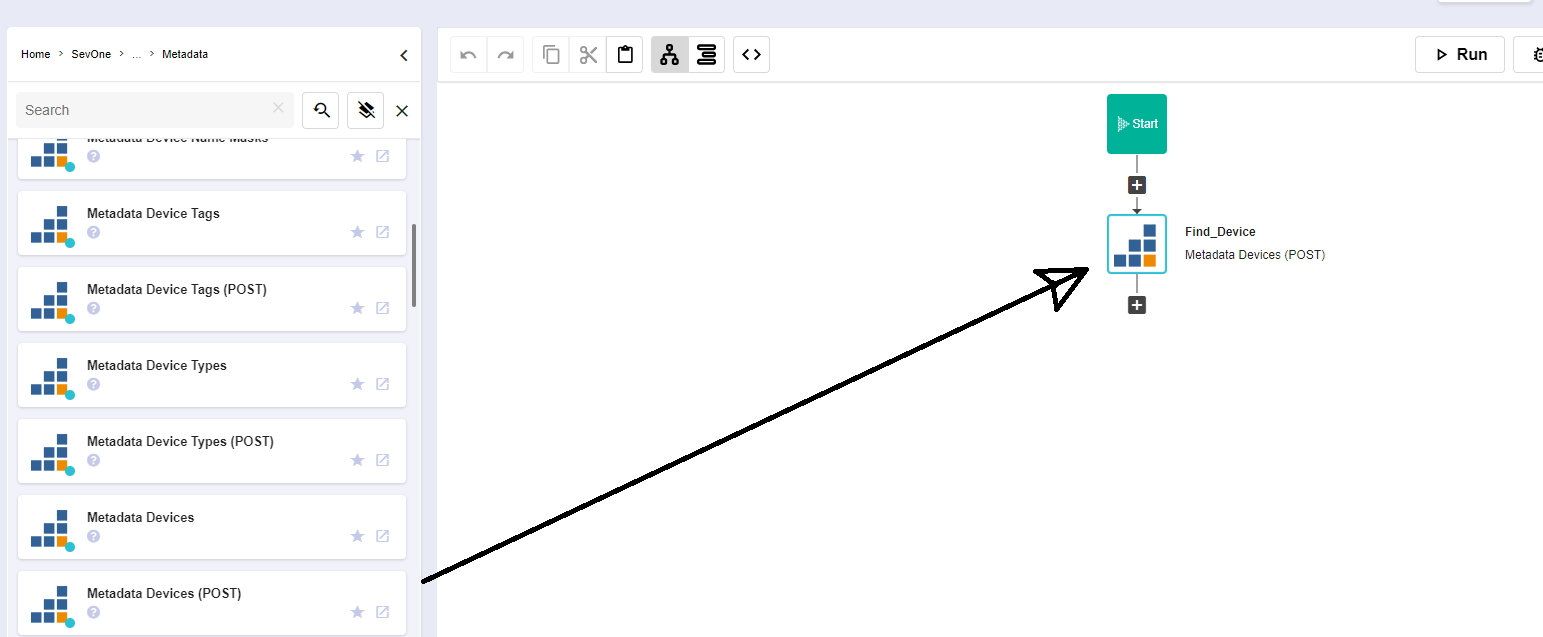
Change to Flow View
On the left hand side panel, search for SevOne, Click on SevOne -> REST v3 -> Metadata
Select Metadata Devices (POST) and drop it after the building block START
Change name of the building block to Find_Device
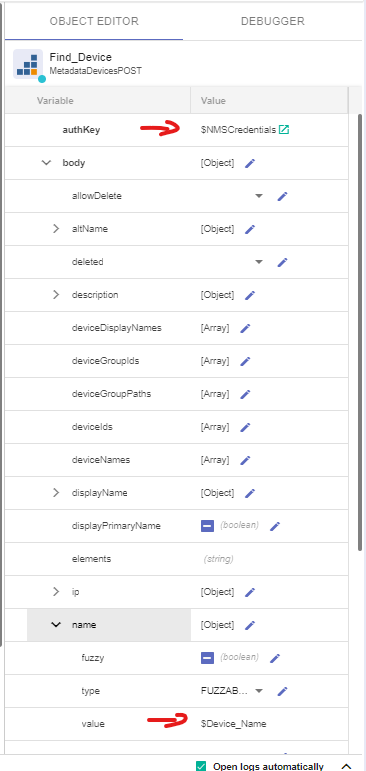
Click on the building block to open the right hand side panel and complete it with these options:
a. authKey: $NMSCredentials
b. body -> name -> value: $Device_Name
Add a new building block, SevOne -> REST v3 -> Metadata -> Metadata Plugins (POST)
Change name of the building block to Find_Plugin
Click on the building block to open the right hand side panel and complete it with these options:
a. authKey: $NMSCredentials
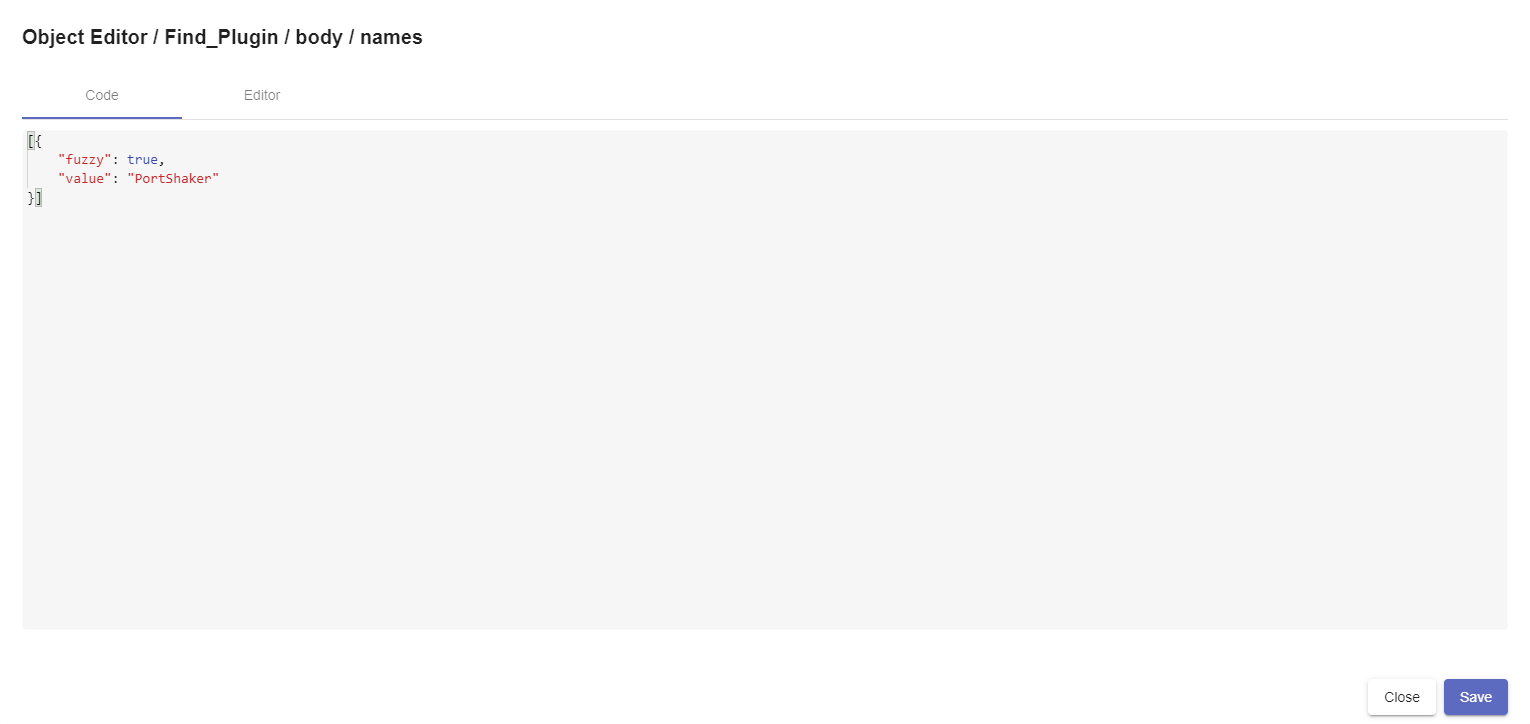
b. body -> names -> click on the pencil icon and paste the following text:
(without the quotes) " [{
"fuzzy": true,

"value": "PortShaker"
}] "
Add a new building block, SevOne -> REST v3 -> Metadata -> Metadata Object Types (POST)
Change name of the building block to Find_Object_Type
Click on the building block to open the right hand side panel and complete it with these options:
a. authKey: $NMSCredentials
b. body -> pluginId: $Find_Plugin.result.plugins[0].id
Add a new building block, Common -> If
a. Change name of the building block to Add_or_Remove
b. Click on the building block to open the right hand side panel:
i. condition: $Action == "add"
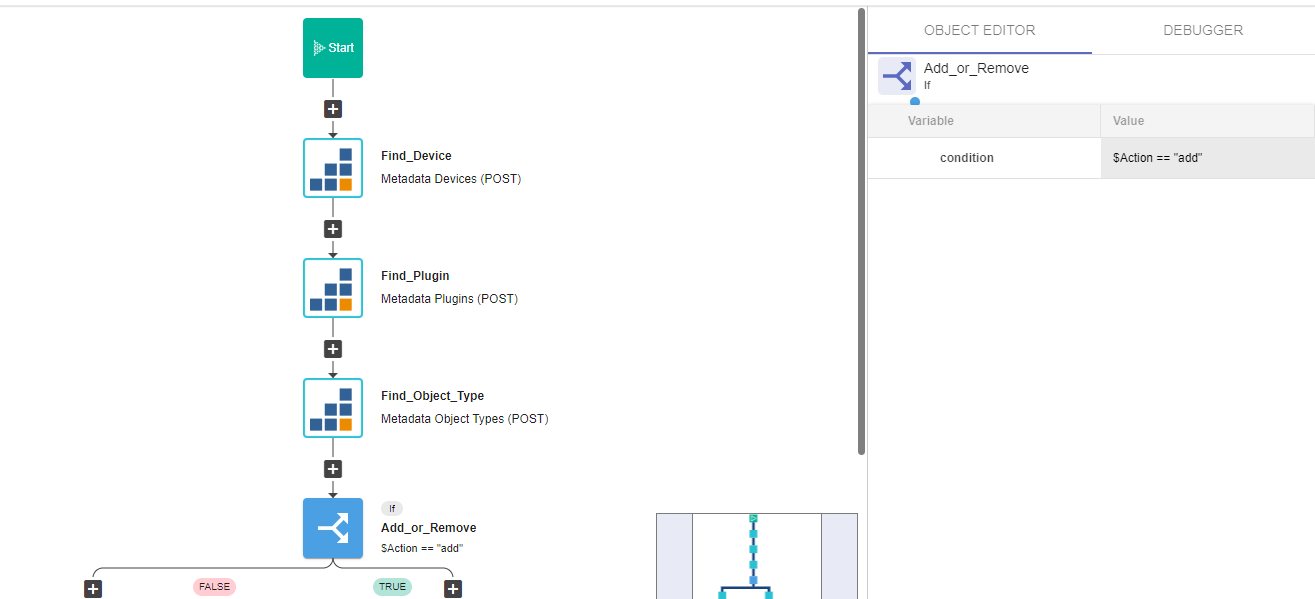
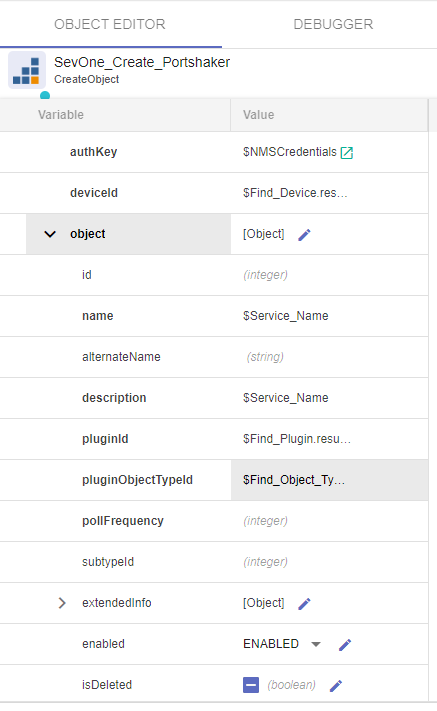
On the TRUE branch of the if, add a new building block, SevOne -> REST v2 -> Objects -> Create Object
Change name of the building block to SevOne_Create_PortShaker
Click on the building block to open the right hand side panel and complete it with these options:
a. authKey: $NMSCredentials
b. deviceId: $Find_Device.result.devices[0].id
c. object:
i. name: $Service_Name

ii. description: $Service_Name

iii. pluginId: $Find_Plugin.result.plugins[0].id

iv. pluginOjbectTypeId: $Find_Object_Type.result.objectTypes[0].id
Add a new building block, Common -> Assign
a. Change the name to Result
b. variable: $result
c. value: $SevOne_Create_Portshaker.result
Add a new building block, SevOne -> REST v2 -> Discovery -> Run Discover Device
Change name of the building block to SevOne_Discover
Click on the building block to open the right hand side panel and complete it with these options:
a. authKey: $NMSCredentials
b. id: $Find_Device.result.devices[0].id
c. localOnly: false
Now let's focus on the FALSE branch of the if
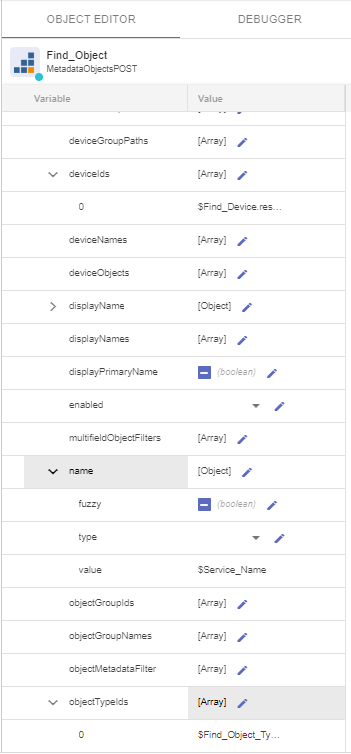
Add a new building block, SevOne -> REST v3 -> Metadata -> Metadata Object (POST)
Change name to Find_Object
Click on the building block to open the right hand side panel and complete it with these options:
a. authKey: $NMSCredentials
b. body: i. deviceIds: [ $Find_Device.result.devices[0].id ]
ii. name -> value: $Service_Name

iii. objectTypeIds: [ $Find_Object_Type.result.objectTypes[0].id ]
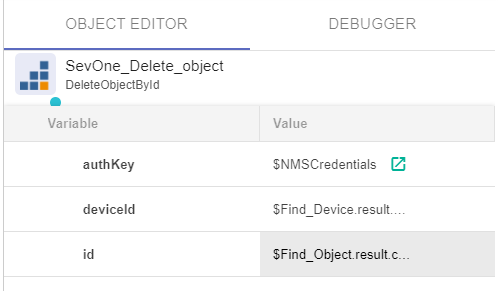
Add a new building block, SevOne -> REST v2 -> Objects -> Delete Object by Id
Change name to SevOne_Delete_Object
Click on the building block to open the right hand side panel and complete it with these options:
a. authKey: $NMSCredentials
b. deviceId: $Find_Device.result.devices[0].id
c. id: $Find_Object.result.objects[0].id
Add a new building block, Common -> Assign
a. Change the name to Result2
b. variable: $result
c. value: $SevOne_Delete_object.result.body
- If there is any other building block after these, please delete it
Automation Center
Go to Automation Center
Click on Create Panel
a. Title: TCP Port Monitor
Click on Create tile
a. Select workflow: Your Name - Create PortShaker
Click Next
Title: Add TCP Port
Click Next
Select override on:
a. Device_Name
b. Port
c. Service_Name
d. Action -> change value to "add"
Select Hide on
a. Action
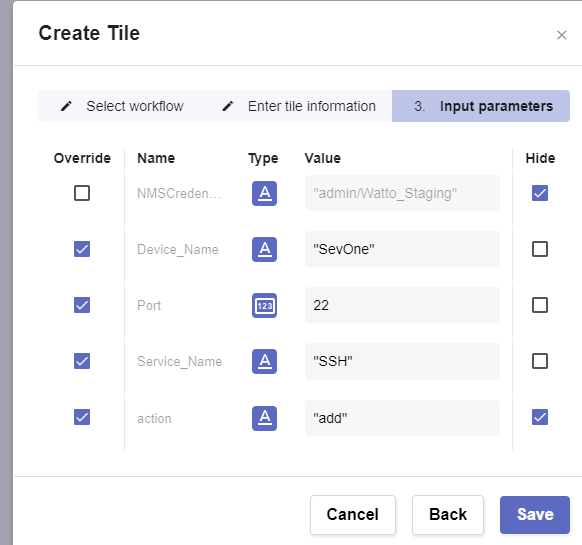
Click on Create tile
a. Select workflow: Your Name - Create PortShaker
Click Next
Title: Delete TCP Port
Click Next
Select override on:
a. Device_Name
b. Service_Name
Select Hide on
a. Port
b. Action
Review
Go to Automation Center
Click on TCP Port Monitor
Click on Add TCP Port
a. You may change the device name, port and service name if you want to, otherwise leave the default values
Click Execute